Turn Your Weeds into Nutrient-Rich Fertilizer 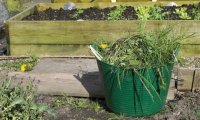
Many plotholders spend hours pulling up weeds and often find themselves at a loss as what can be done with them, particularly perennial weeds. This can be disappointing as there is no useful end product at the end of this labour.
Reluctant to put them into the compost heap, many plotholders put them into skips or green waste cages, losing potential benefits to soil and potential to increase crop yields, however there is hope.
Have you consider turning them into a free organic liquid fertilizer? Liquid fertilizer—also known as weed tea,( but don’t drink it!) is easy to make and will give your plot a boost of nutrients, including nitrogen, phosphorus, potassium, magnesium, boron, copper, manganese, sulphur, iron and silicon. You can use weed tea on both flower beds and vegetable plots, either by pouring it on the soil at the base of the plants, or by spraying it on the leaves. Perennial weeds, especially those with very deep roots such as dandelions, dock and creeping buttercup, have mined valuable minerals and other vital nutrients from the soil and store the nutrients in their roots and leaves.
When you pull up these weeds and simply throw them out, you toss out the minerals and nutrients as well. Turning the weeds into liquid fertilizer returns the nutrients to the soil. It is recycling at its best. All weeds are candidates for liquid fertilizer however it is essential to catch the weeds before they flower. Making Weed Tea Turning weeds into liquid fertilizer is rather easy.
- Get a large bucket or other container with a lid and line it with a hessian sack or old onion set/bulb bag (it must be permeable for the process to work).Tie the bag to the lid or handle of the container (you do not want to be fishing the bag out of the mixture later !!!)
- Put the pulled-up weeds (including both roots and leaves but removing as much soil as possible) and put them in the bag in the bucket.
- Add water. Put about 8 cups of water in the bucket for every pound of weeds; the water should cover the weeds in the bottom of the sack
- Cover the bucket with a tight-fitting lid.
- Leave the bucket for 6 to 8 weeks. This should ensure the perennial roots are not able to create new growth at the end of the process
- Stir it every week or so. But be forewarned—the fermentation process can be aromatic; think of it as having an earthy, agricultural aroma! Try not to get any of this concentrated concoction on your hands or clothes; it will stain.
- Remove the bag, the liquid is what you will want to use on your plot; the solid mass of fermented weeds may be added to a fresh compost heap. After you have removed the sack and you are left only with liquid, it is done. (It can be worthwhile to remove any small pieces of organic matter which may gum up nozzles if you intend to use the liquid as a foliar spray.)
- Dilute it before using, at the rate of 1 part weed tea to 10 parts water. Then pour it on the soil at the base of your plants. To use it as a fertilizing foliar spray, dilute it until the colour of the liquid is like a weak tea. You can also pour it on the base of your vegetable plants, but don’t spray it on the vegetables that are ready to be harvested.
You can also add aged manure or herbs to the bucket, along with grass clippings and pruned-off plant parts. They all contain nutrients that can be recycled back into the soil through this process. It’s best to use the weed tea during the same season you produced it, the quicker the better. People have been gardening for thousands of years, and did not always have manufactured fertilizers available for purchase. They used what they had available—including weeds— and made their own fertilizer. Making liquid fertilizer from weeds is a back-to-basics way of returning the nutrients in weeds to the soil and avoids increasing waste going to landfill. What could be easier?